
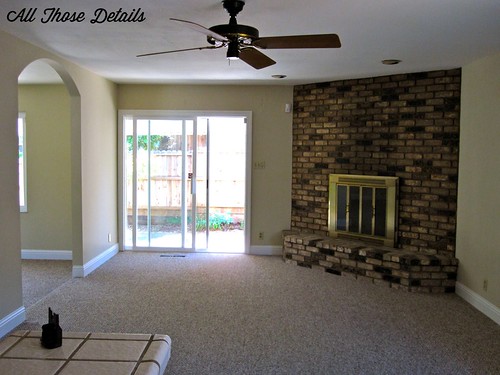
This was a picture I took when I first toured the house, before buying it. See how much it overwhelms the room?
Our kitchen/living/dining/entryway remodel is practically complete! As we’ve been wrapping up little finishing projects one large, ugly problem has surfaced. Our fireplace is right in the middle of our remodeled space and we haven’t touched it, so there it sits all its dated brick and brass glory. Ugh.
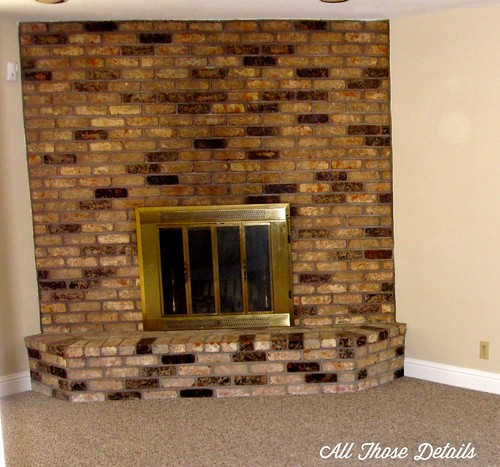
Just look at it! I couldn’t even get a picture to come out well. My camera is clearly rejecting 1960’s style.
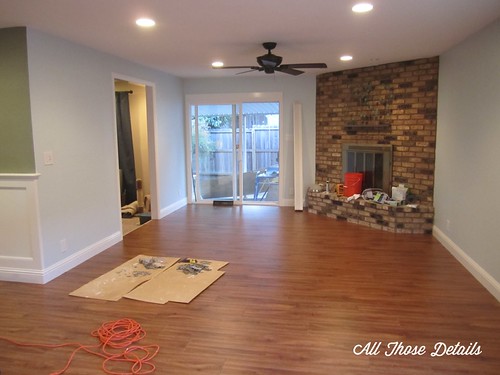
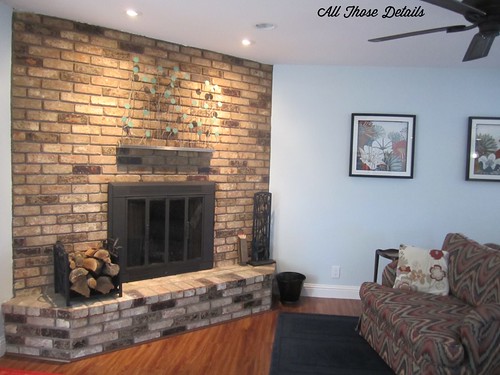
The kitchen was such an eyesore before the remodel (pictures of the finished kitchen soon!), that the fireplace sort of blended in. But now that the fireplace is looking so awful, I realized something had to be done! The longer term plan is to actually drywall over most of the brick, and maybe even the hearth. However, we just can’t take on another big project like that right now. My solution is to paint the brass fireplace doors and frame a matte black to at least take away the sparkling “look at me” effect. Below is a picture after the remodel, everything is nice and updated except the giant brick corner. (I’m sure at this point you’re getting just how much I dislike this thing!)
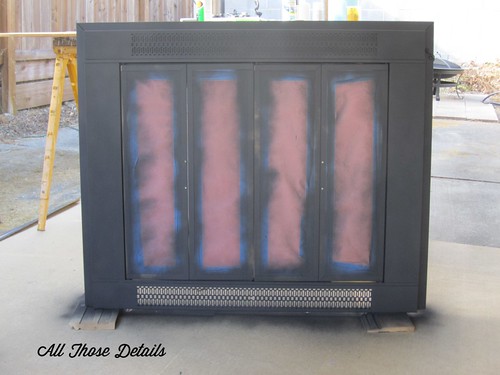
 I hadn’t really spray painted that much before (I know, a sin in the diy blogging world!), so I was pretty nervous that I would somehow turn the doors into a sloppy, drippy, paint peeling mess. But, considering how ugly it already was, I decided to just go for it! I chose to use high-heat paint since we actually do use our fireplace.
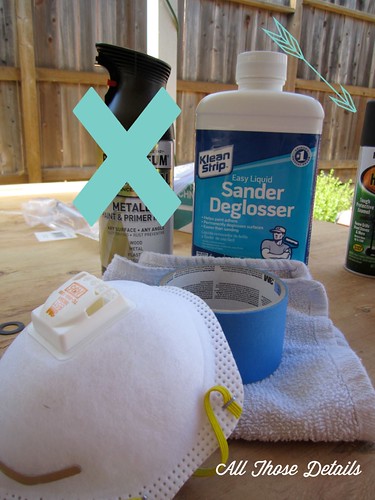
Wrong paint in the picture! i used High heat paint in matte black from Rustoleum.
Materials
- Deglosser
- Rags
- High-Heat Spray Paint
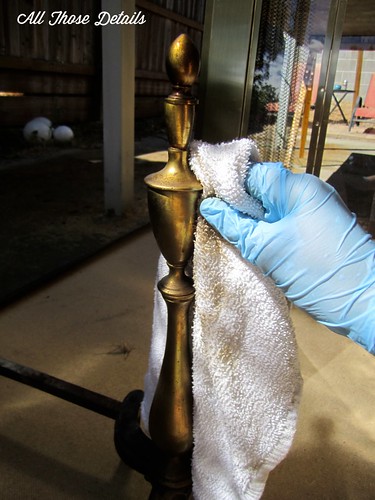
- Gloves
- Dust Mask
- Space to paint – I placed a sheet ramboard out on our concrete patio and that was plenty of space, and leaned the frame up against a sawhorse
Details
Take apart everything & clean it (I actually just hosed it down!). If there is insulation on the backside of the door frames, be sure to remove it before hosing it down. Yep, I missed a couple of pieces and they ended up being a soggy mess!
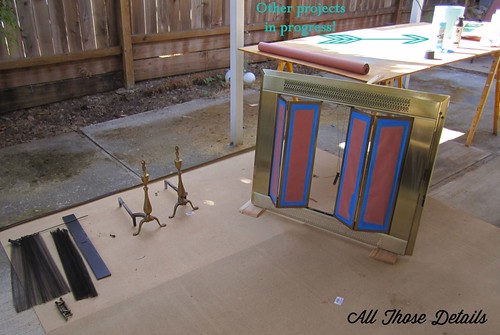
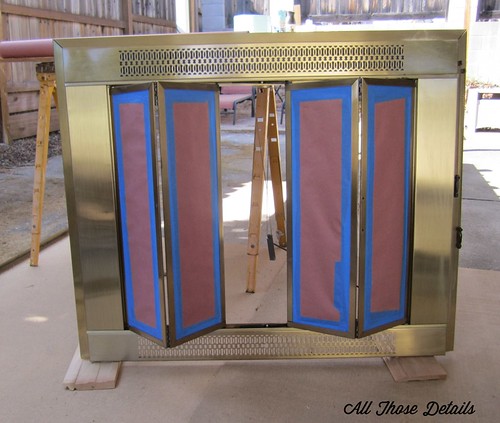
Tape off any areas that won’t be getting paint (aka the glass doors)
Degloss surface to increase ability of paint to stick. Follow directions on the deglosser. In my case, I just had to it wipe on with a cloth & let it dry.
Set up each piece so that you can get at all angles without touching the piece. I set mine out from a saw horse by leaning it against an extra scrap of wood that I nailed to a sheet of plywood.
The high-heat paint actually recommended to NOT prime the surface first, so I didn’t prime it. The paint covered well, so I think I made the right choice to actually follow directions (sometimes I think I know better and make my own rules when crafting, I say that works out for me only about half of the time!)
Spray light coats to keep dripping at a minimum. The first coat did not cover AT ALL and so I stayed nervous. By about the third light coat it was looking pretty good.
Overall it was probably about 5 light coats. Although I wasn’t that uniform about it, and just kept lightly touching up areas that needed more paint, with the exception of a good once over for the first and last coats.
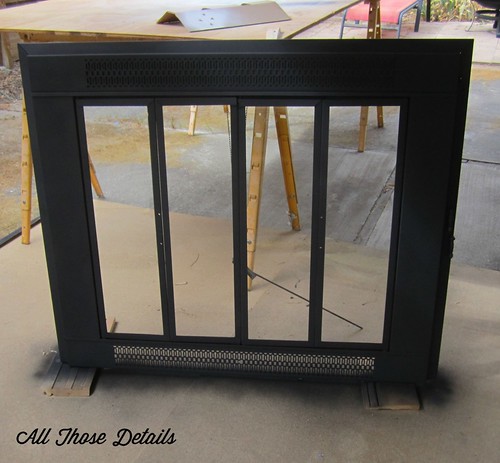
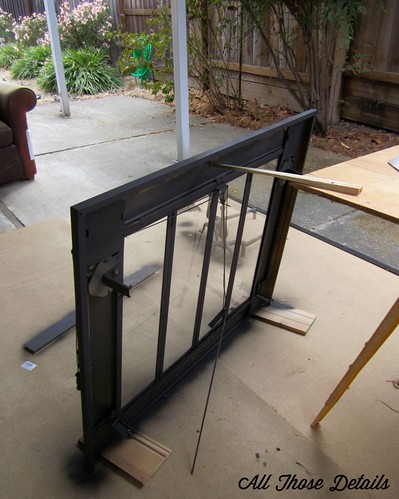
I let mine dry overnight, then installed the doors back into the fireplace. I have to say that all my nervousness was for not, because it looks amazing!

Now the room is looking a lot more modern, and the fireplace doesn’t quite stand out so much.
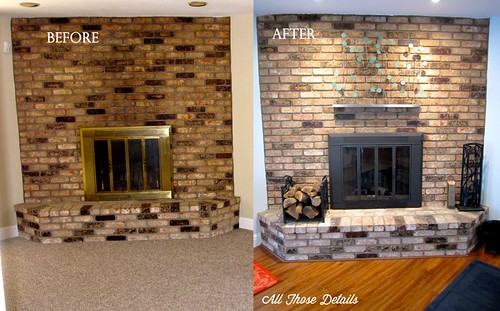
Here’s the before and after. We also upgraded the lighting and mounted a sculpture in place of a mantel (we’re hunting for a piece of cool, old wood for a mantel). New paint and flooring were part of the bigger remodel, and are carried through the dining room, kitchen, and down the hallway. All together, I’m extremely happy with how our living room is shaping up!
P.S. I now fully understand the blogger obsession with spray painting things. It looks so good, I’ve already done three more projects!

How do I take the fireplace door off. That seems like the hard part to me. And I don’t want to paint it inside.
Our fireplace frame just had four set screws that were holding the frame to the brick by pressure. I used a flashlight and stuck my head into the fireplace and the were pretty easy to see. I could loosen them by hand and the the whole thing pulled right out! Just put a tarp down between your fireplace & the door in case of ash, cobwebs etc that might fall off (mine was super dirty!). Good luck!
How did you get the screen out?
Omg this is my problem. I took door off and can’t figure out how to get back on. I don’t know where 2/4 screws go cause they fell off when removing door. It looks the same as yours.
It looks amazing! We need to do exactly this. And maybe see about securing it with screws like yours since one of Amity’s favorite games is to pull off the whole glass screen and get stuck under it. If nothing else my baby deserves to get stuck under a nice-looking door! 🙂
Hi,
Where did you get the “Matt black” spray paint from? HomeDepot and Lowe’s don’t carry it. They have one called “Flat black”.
I actually did get the spray paint from Home Depot. Flat black should produce the same look as a Matte paint. They probably just changed the name in the label! Good luck with your project!
so we actually did ours about the same time! my problem is when I touch the black, it leaves some paint on my hands. not like its wet but it looks like soot. are you having issues with the paint rubbing off?
Oh no! I haven’t had that problem. I would guess that either the paint isn’t sticking or it is overspray. For overspray, try to gently wipe off the doors with a damp rag. Then you shouldn’t get paint (or as much) coming off on your hands. It it didn’t stick, maybe remove the paint or degloss & try again? Another option might be to paint a sealant on top, but that finish might not look as nice. What a bummer!
same problem – did you figure out a way to keep the paint from rubbing off?
The transition is great! We have a similar project to tackle in the next week. How many cans of spray paint did you go through? (Trying to decrease the number of times we run back to home depot just to “pick up one more thing”). Thanks!
It’s a great little project that makes a big difference. I used about one and a half cans of spray paint. You’ll probably be safe with two cans, unless you have a lot more surface area than I do. Have fun!
I am so happy to see your blog. I just now am almost finished taping off my doors and glass from the fireplace brick. Mine is so old I was afraid I’d break the screws if I tried to remove them as they were so tight. So instead I placed a lot of newspaper around and will be painting it soon (I hope) in place. Your results are wonderful and hope mine turn out as well. I was going to use some semi gloss black, but decided not to as I prefer the matt black finishes better.
Besides, it is about 5-10 degrees here in NE Ohio so this would not be an outside project at this time of the year. I am using 2 cans of leftover paint, but I can always buy more to finish it with several thin coats.
Sandy, how did yours come out by leaving it on? We are in the same situation with the weather being cold.
Thanks for sharing, this is just the motivation I need. Your fireplace looks great!
When I spray paint do you paint the brass frame inside to or just the out side
Please and thank you
Hi Husin! I painted both the inside & outside. On mine, you can really see the inside so I thought it would look strange to see brass peeking out. The paint has held up really well to the heat too.
So happy to read this post. I was looking for exactly this–what to do with the ugly brass doors at a house we just bought. Have you considered painting your brick? After looking at lots of pics I think that’s what I’m going to do. I could see that looking awesome with your room.
Actually, your brick looks so different in the “After” picture. How did that happen? Our brick is sooooo dark for the room. Just looking for options. P.S. Love your wood floor.
The brick does look lighter doesn’t it? Before the walls were a muddy beige, and now they’re light blue, which I think brightened the whole room. We thought about painting the brick, but we’ll probably end up drywalling over it. (The floors are actually laminate!)
Another blogger did a 30 minute white wash over her brick surround, and it was a magical transformation. I encourage you to do it!
I love this! Our screen is black and brass and I want to paint it navy, I know have the courage to do it! WOOOOO HOOOOO
Hello,
How many cans of spray paint would I need?
Hi! I think I used about 1.5 cans of paint.
Hi Sarah! Thank you for sharing this. I painted my ugly brass insert today. But now I am sort of worrying if I used a wrong Deglosser – any little movement will knick the paint and it’s dry to touch, but I get black on my finger. Ours is sort of old and drags when opening doors so I’m definitely afraid this will scratch all the paint off. I used Rustoleum High Heat too. Any suggestions? I am so scared to even move it back inside in fear I’m going to mess it up!
Oh no! Maybe yours still had some polish on it so the paint wouldn’t stick? Lucie commented having a similar problem. Hopefully it’s just overspray. If so, use a damp rag on an inconspicuous place and try and wipe it away. The overspray (soot like material) should wipe off, but the paint shouldn’t be affected. I hope that works!
I messed up, I spray painted the grill with a black matte spray, non high temp, can i just paint over with the high temp paint. It is a gas fireplace, don’t know if that matters.
I’m actually not sure how the regular paint would react. The regular paint might hold up just fine, but I think it wouldn’t hurt to put a layer of high temp paint over it as a precaution.
Exactly what I need to do!!! However, I can’t find any liquid deglosser in Canada, at least not in my area. Can I skip this step??!!
The deglosser is how I got the paint to stick, so I think a light sanding would help in your case. After sanding, just make sure to clean it really well to make sure you get off any loose bits. Good luck!
did you paint the netting?
Mine was already black, so I did not. It might be hard (but not impossible) to get all those tiny corners painted!
it is not that bad to paint, by all means paint the netting, it will look brand new!
Just wanted to say thanks for the fireplace post – well done to you for taking the initiative and figuring it out. Any suggestions on colors other than black?
good tutotrial. When I took the fireplace doors off, my insulation tore off. Where is the best place to buy the insulation?
You can buy the insulation on Amazon. It’s pretty inexpensive & not worth your time or the gas to run around looking. I used a very fine steel wool on every inch of the fireplace doors & frame. Cleaned it off & used the same deglosser. I used 2 cans of high heat paint by Rustoleum. an d painted the screens too. I have the flat kind, not the sliding curtain style. I did everything as Sarah explained with the additional step of a light sandng. It’s beautiful. No paint comes off, either.
Has anyone just used Rust-Oleum flat black paint (not high heat) on the gas fireplace brass, and did it work? MM
Don’t do it! It will buckle and burn. Hi-Temp is the only way to go.
Thank you! I wouldn’t have had a clue how to go about this.
Pingback: How to Home Stage Fireplaces | Signature Furniture Rental · The San Diego Furniture Rental Blog – Signature Furniture Rental
how many cans of spray paint did you need?
Hi, I have almost the exact, if not the exact brass doors. Do you think this project would look as good with the white high heat paint? I have a grey tile fireplace that is inset with raised white tile stars that are pretty cool, but the brass is wretched.
Pingback: Kylie M Interiors - How to Update your Fireplace - 5 Easy Update Ideas
thanks for the hints and idea, I bought just one can of paint so probely should get one more just in case. I think im going to do the screen too. So excited to get at this ugly brass old fashion doors. Hoping for the best that it doesnt come off as I’ve read a couple of u’s that have had that problem. Fingers crossed and going for it……
Hello, I just followed your instructions but used steel wool, then sanded, then deglosser, then painted yesterday, left overnight to dry and now I am so sad to say that it looks fantastic but every little touch causes a nick where brass shows through plus the soot. Looking at another site said something about real brass being very hard for paint to adhere to and mine is definitely real brass. Wondering if anyone every found a solution to this problem.
I just painted or brass fireplace with the rustoleom high heat. Home depot suggested the regular high heat, not the ulta. Also after cleaning the brass to wipe it down with rubbing alcohol for a thorough cleaning which made the spray paint stick better. One can of spray paint and it looks awesome! Finally completing some of my Pins!
How much spray paint did you go through? I want to make sure I buy enough cans!
I used almost two cans on my doors. I bought 3 just to be safe!
I followed all the instructions and while it looks better, any little touch scratches the matte black and the brass shows. I’m very disappointed.
I was looking at my brass fireplace yesterday and stayed up all night wondering what to do with it. I am so glad I found this site and I will be at HomeDepot later today. Thank you Sarah.
How does the high heat paint hold up over time? Any bubbling or lifting?
Hi Sarah – We are about to embark on this project. How has it held up? Any flaking or wear and tear? We really use our fireplace a lot in the winter so want to make sure it is durable.
Hi Tom! It still is looking really good. But I live in California, where we’ve had very mind winters since it painted it. We’ve only used it about 15 times total, but it still looks like the day I painted it.
Can I paint the frame with a brush nickle paint
I tackled my fireplace last weekend and had a few extra learnings to share…
1. I am also noticing an issue with the paint scratching due to the the old rickety doors not sliding easily. I’m afraid that since this was my first time using deglosser, I may not have used it correctly… but I wasn’t able to tell.
2. I’m in a pretty old house and when I took the whole fireplace frame out the bottom bolt anchors came with it (and they almost disintegrated to the touch). Now I have a “decorative” frame (held in by the top two bolts/resting on the bottom of the fireplace) until I can find a way to install new anchors into the slate base of the fireplace.
3. Be careful with the small screws for the doors! As I was re-installing the doors, I ended up dropping two of the screws into oblivion and now one door is just resting in the track.
While it sounds like a pretty failed experience, even the decorative look is a much better upgrade than the brassy look. And… because we have an unconventional sized fireplace which will be even more expensive to replace, I plan to take a round 2 (stripping/sanding all the paint off) and potentially going with the priming route instead. I still have hope!
I have the same brass screen and want to try this, I did a DIY on my brass bed and learned that the shine is a lacquer coating to stop tarnish (this may be what’s causing the chipping). I will use paint stripper on my screen first and then let it tarnish to see how it ages and looks before painting.
Before I read your experience, I looked up how to do it on the internet. The advice was to use a self-etching primer on the brass and then a high-heat final color – black in our case. So, today, that’s what I did. . . . However, as I finally actually read the final-color can, I read the “don’t pre-prime” instruction. Oh well, already done. . . . Went ahead and put coats of final color on. Nervous about whether the self-etching primer will give me problems! Anyone have experience?? . . .
Have you had any problems with the paint starting to smell during the first few times you used the fireplace. We have noticed a very strong smell after the fire really gets going and we are a bit concerned.
Well I have forgot how to put the fireplace back together and was wondering if you have any instructions or anything to help me put it back together
Can you use high hear brush on paint?
“my nervousness was for not”
It’s “for naught”, not “for not”. “Naught” is a synonym for “nothing”.
I just tried using the deglosser on my fireplace surround to paint. I am not sure what to do next. My surround was a shiny bronze and I used the deglosser and it started to take the finish off to the metal so now i have peeling going on. Am I supposed to go all the way down to the metal now. If i sand down those areas and spray paint it will show the peeling bumps through or should I now sand the whole thing down??? help?
I used high heat flat black and thought it looked too “flat”. So I went back to the store and bought the high heat semi-gloss and it looks terrible. It shows every drip and flaw no matter how careful I tried to be. Is there any way to dry brush a pewter color over this to “distress” it and hide the flaws?
I like it, don’t get rid of the fireplace.
We used the Rustoleum High heat in B B Q black. It was too flat almost a dark grey. We went back to the store and got the Rustoleum Ultra High Heat. We applied that over the matte finish. It looks so much better. It has a sheen to it and the color is black. Couldn’t be happier.
I have had the same problem some on here have had. I used the Rustoleum High Heat Matte and after it dries black dust comes off when you touch it and leaves a mark on the surface. I called the company and they said this paint needed to be cured by heating at 450F for 1 hour. I took the frame apart and fit what pieces I could in the oven but it didn’t help. On Home Depot’s website I have seen rep’s from Rustoleum say 200F and another one say 250F. Oddly the can says nothing about this. I am wondering if the semi-gloss would work better or if I should buy the quart and try to roll or brush it on.